K8S Client App 프로젝트
Node.js, React, EKS, Jenkins, ArgoCD 를 활용한 K8S Client App 프로젝트
K8S Client App 프로젝트
Devops Project
접속 링크비용 문제로 클러스터를 내렸습니다. 양해부탁드립니다.
[데모 영상] 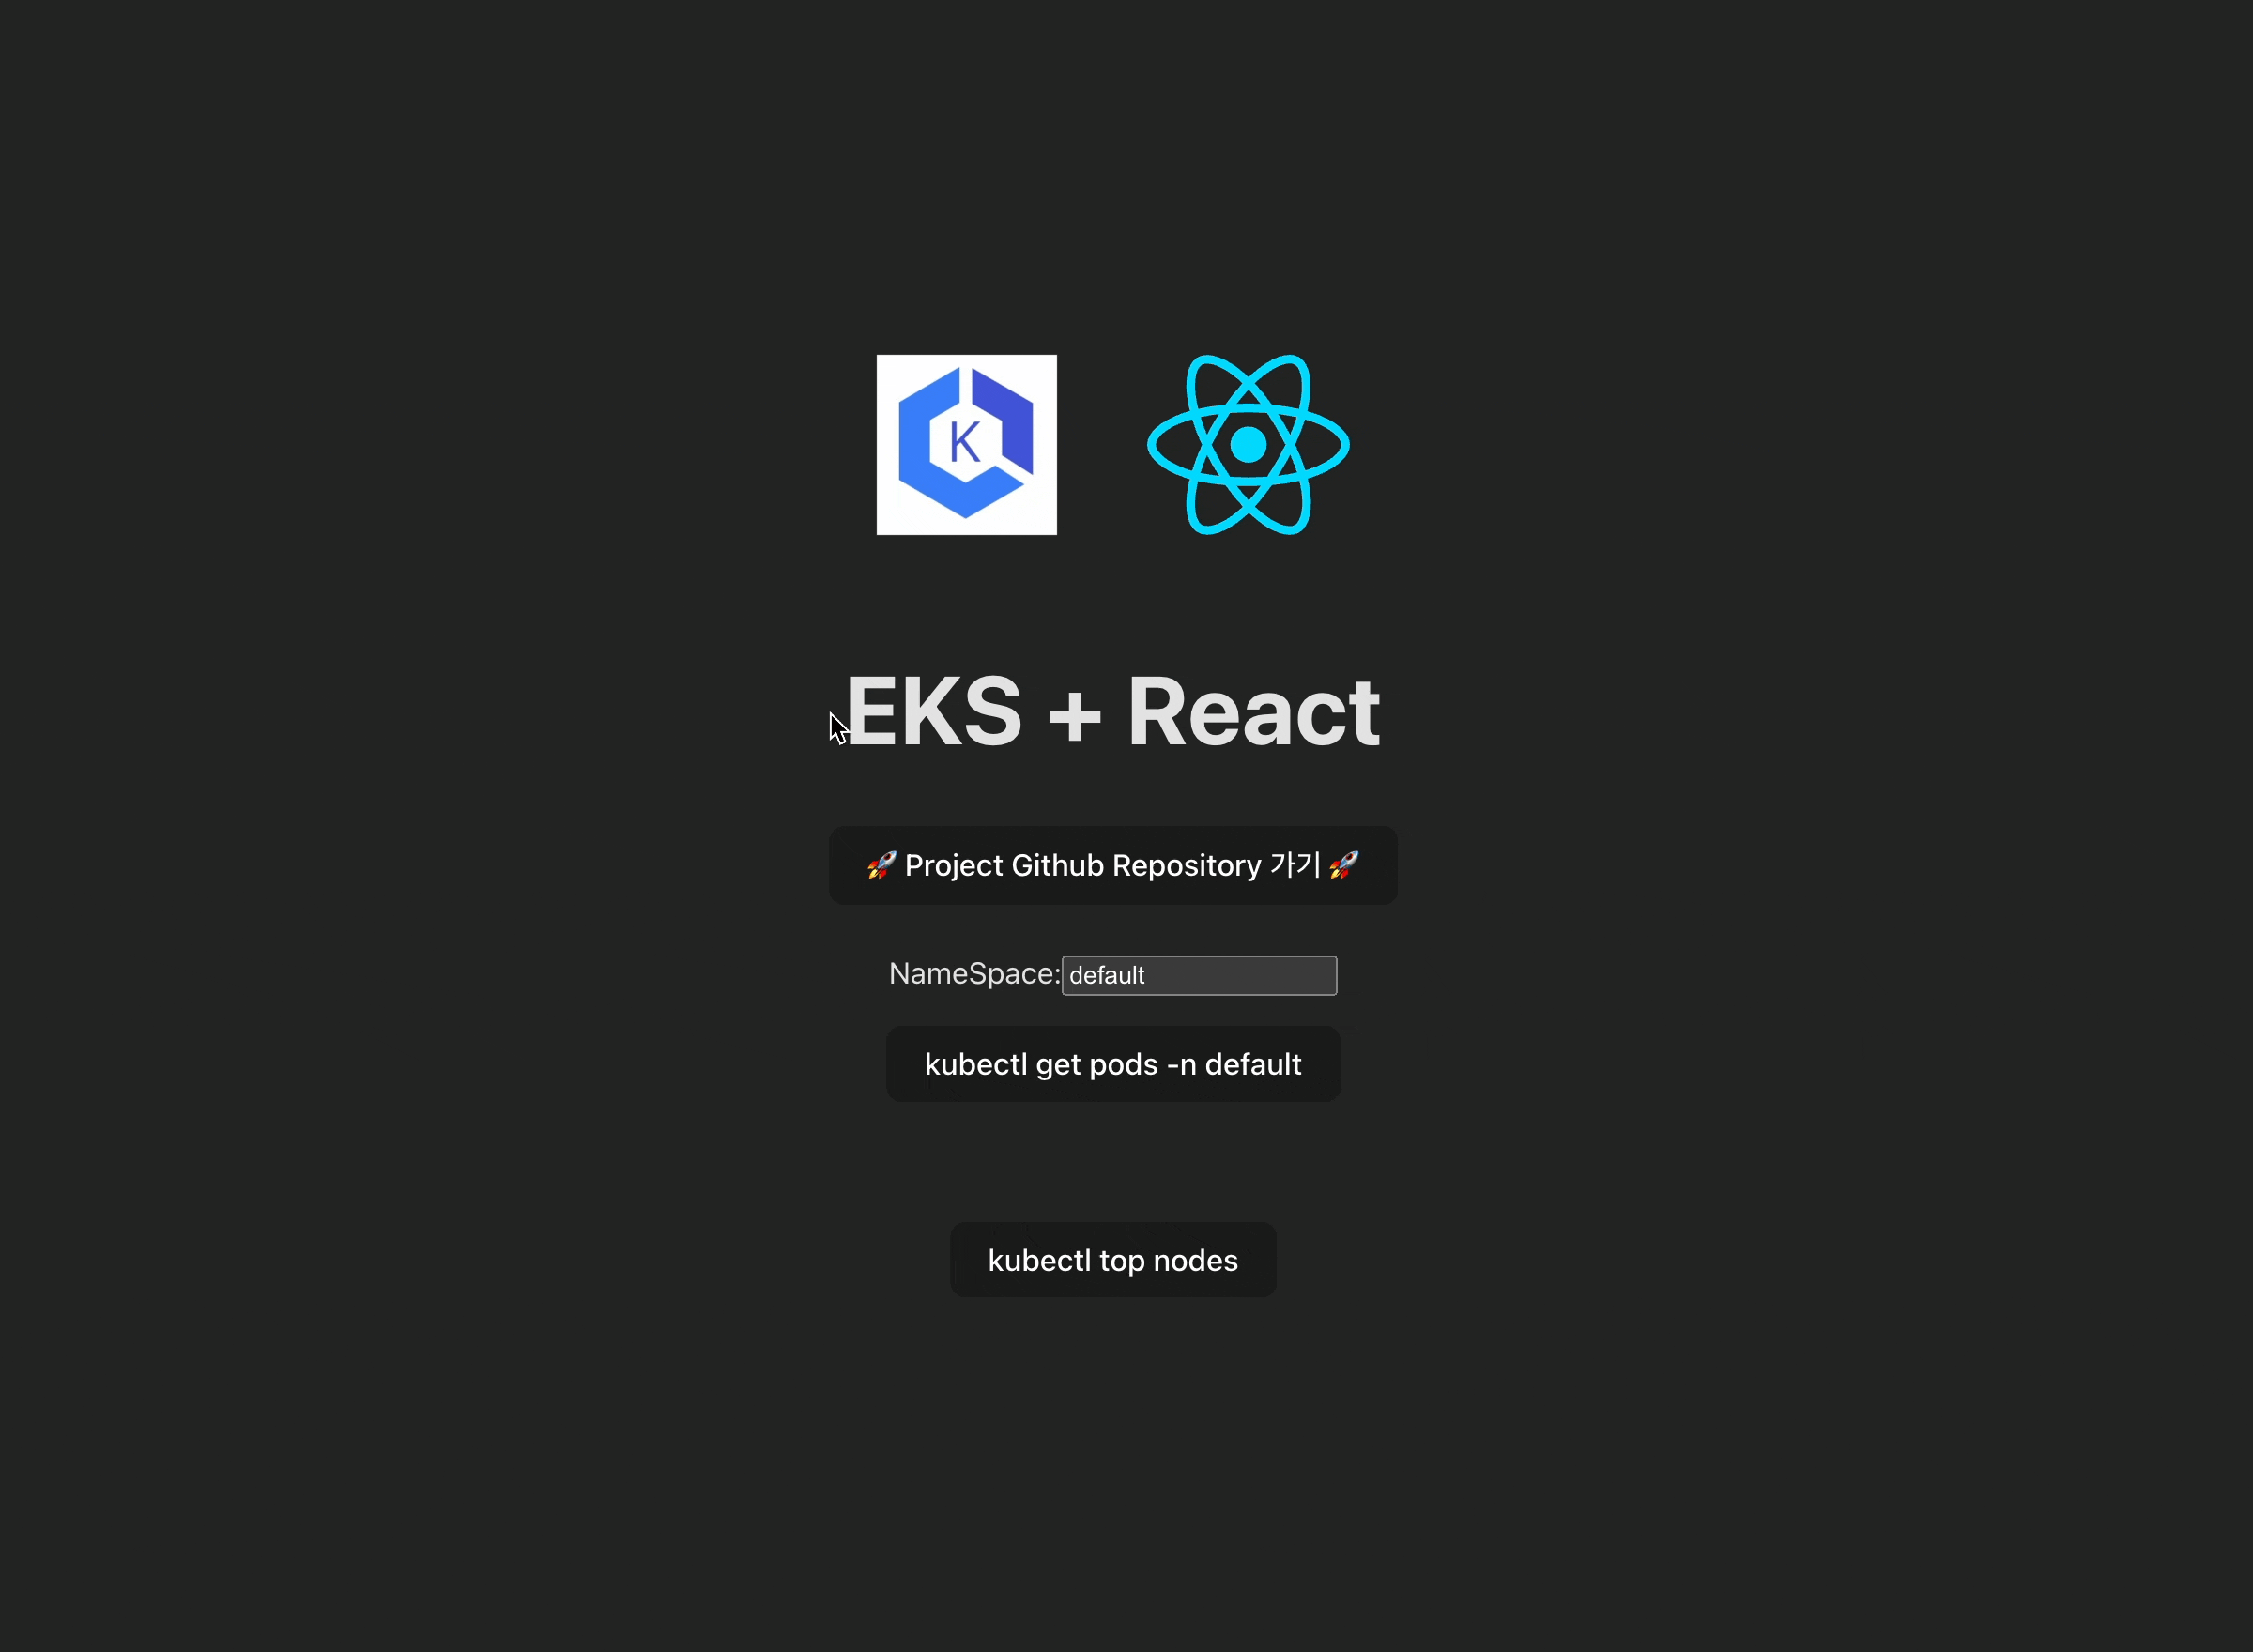
프로젝트 개요: K8S Client App
[요구사항]
- SPA 에서 Kubectl get pods, k top nodes 표출
- Jenkins, ArgoCD 활용 CI/CD 자동화 구축
- AWS EKS Cluster 구성
Project 구성
[CI/CD 구성도] 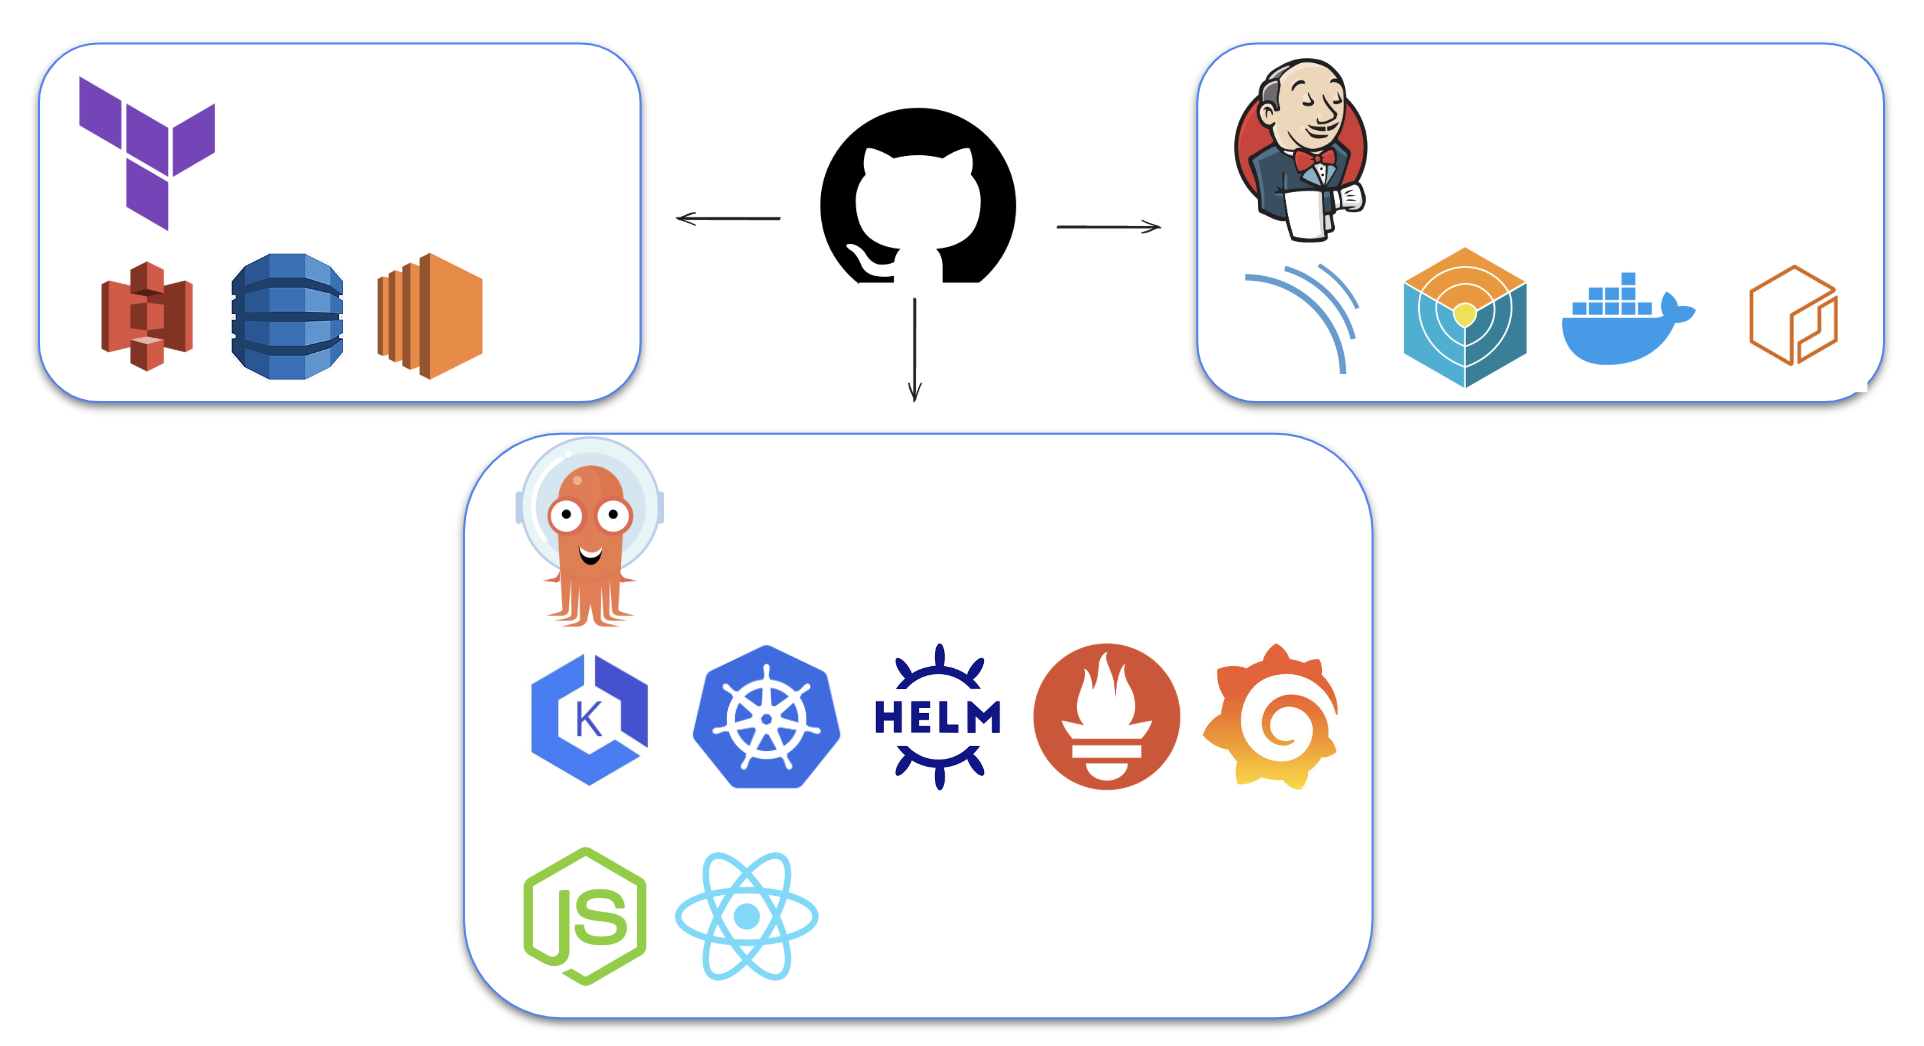
[APP 구성도] 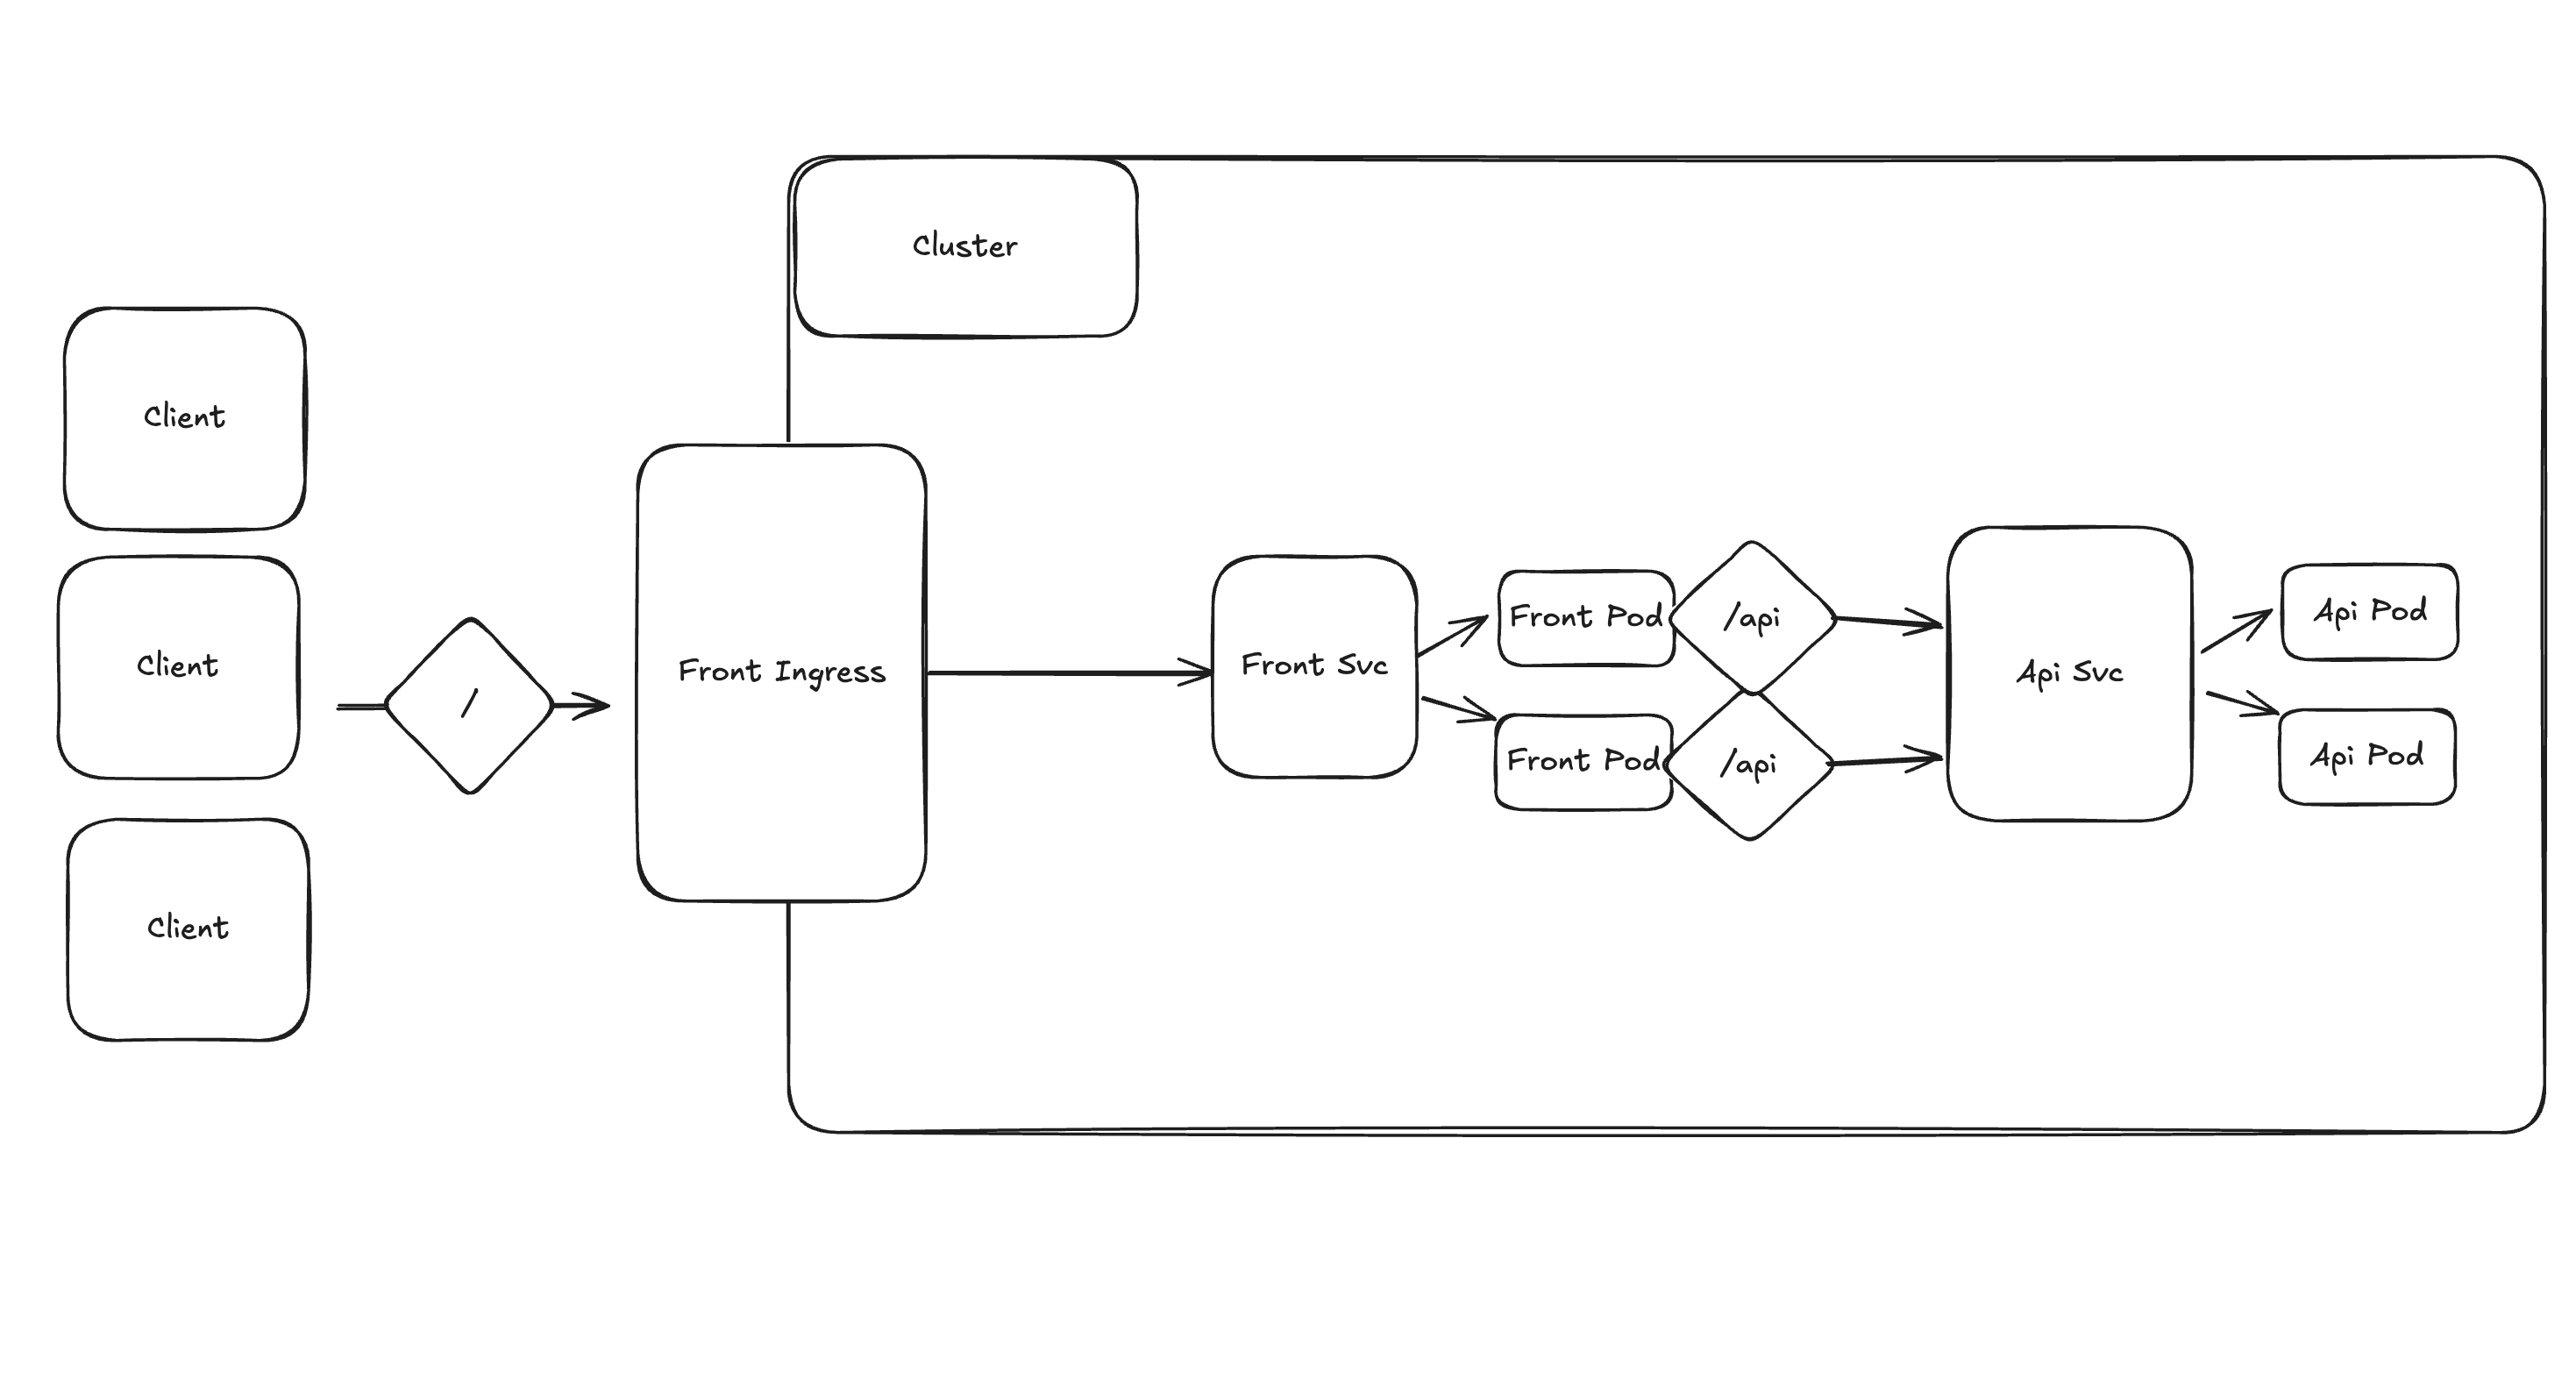
- Terraform Provisioning
- Jenkins Server (EC2 t2.medium)
- Terraform Backend (S3, DynamoDB)
- Jenkins
- Github, Sonar Qube, Trivy, Docker, ECR

- Github, Sonar Qube, Trivy, Docker, ECR
- ArgoCD
- ArgoCD, EKS (K8S), Helm,
- Monitoring
- Prometheus
- Grafana
- Application
- Node.js (express), React.js, kubernetes/Client-node
📚 Table of Contents
- 1. Jenkins Server 세팅
- 2. SonarQube 세팅
- 3. ECR 세팅
- 7. AWS EKS Cluster
- 8. Prometheus, Grafana 설치
- 9. ArgoCD 설정
- 99. Trouble Shooting
- ❌ Dependency Check 도중 jenkins server 응답 없음 현상
- ❌ ArgoCD 의 일부 pod 들이 Pending 상태인 상황
- ❌ Node App 에서 kubectl get pods 권한 이슈
- ❌ Frontend - 503 Service Temporarily Unavailable
- ❌ ArgoCD - Sync 무한 로딩
- ❌ FrontEnd Pod 내부에서 API Service 못찾는 이슈
- ❌ K8s - FrontEnd Deploy 이후 잠깐의 504 Gateway Timeout
1. Jenkins Server 세팅
1.1. Jenkins Server Provisioning (with Terraform)
- terraform 으로 ec2 생성
- user data 로 script 실행
1.2. Jenkins Server CLI configure
1
aws configure
1.3. Jenkins Plugin 설정
- AWS Credentials
- Pipeline: AWS Steps
- Docker
- NodeJS
- SonarQube Scanner
- OWASP Dependency-Check
- Eclipse Temurin installer
2. SonarQube 세팅
2.1. Create a Project
- manual
- Locally
- Generate Token
- Other Build
- Linux
위 과정을 통해 frontend, backend 모두 생성
2.2. Create a Webhook
3. ECR 세팅
3.1. ECR 생성
- frontend, backend ecr repository 생성
4. jenkins Credentials 생성
- AWS Credentials
- Github Credentials
- SonarQube Token
- ECR repo name
5. Jenkins Tools 설정
- jdk installation
- SonarQube Scanner installation
- nodeJS
- Dependency-Check
- Docker
6. Jenkins System 설정
- SonarQube IP 설정
7. AWS EKS Cluster
7.1. EKS Cluster 생성
1
2
3
4
5
6
7
eksctl create cluster \
  --name devops-project-2-k8s-eks-cluster \
  --region ap-northeast-2 \
  --node-type t2.medium \
  --nodes-min 2 \
  --nodes-max 2
7.2. Load Balancer 설정
1
2
3
4
5
6
7
8
9
10
11
12
13
14
15
16
17
18
19
20
21
22
23
24
25
26
27
28
29
30
31
32
33
34
35
curl -O https://raw.githubusercontent.com/kubernetes-sigs/aws-load-balancer-controller/refs/heads/main/docs/install/iam_policy.json

# IAM Policy 생성
aws iam create-policy \
  --policy-name AWSLoadBalancerControllerIAMPolicy \
  --policy-document file://iam_policy.json


eksctl utils associate-iam-oidc-provider \
  --region=ap-northeast-2 \
  --cluster=devops-project-2-k8s-eks-cluster \
  --approve

# IAM Role 및 Kubernetes의 Service Account 생성
eksctl create iamserviceaccount \
  --cluster=devops-project-2-k8s-eks-cluster \
  --namespace=kube-system \
  --name=aws-load-balancer-controller \
  --role-name AmazonEKSLoadBalancerControllerRole \ --attach-policy-arn=arn:aws:iam::<your-account-id>:policy/AWSLoadBalancerControllerIAMPolicy \
  --approve \
  --region=ap-northeast-2

# Helm Repository 추가
helm repo add eks https://aws.github.io/eks-charts
helm repo update eks

# AWS Load Balancer Controller 설치
helm install aws-load-balancer-controller eks/aws-load-balancer-controller \
  -n kube-system \
  --set clusterName=devops-project-2-k8s-eks-cluster \
  --set serviceAccount.create=false \
  --set serviceAccount.name=aws-load-balancer-controller

# 확인
kubectl get deployment -n kube-system aws-load-balancer-controller
8. Prometheus, Grafana 설치
8.1. 설치
1
2
3
4
5
6
7
8
helm repo add stable https://charts.helm.sh/stable
helm repo add prometheus-community https://prometheus-community.github.io/helm-charts

kubectl create ns monitoring
helm install stable prometheus-community/kube-prometheus-stack -n monitoring

kubectl get pods -n monitoring
kubectl get svc -n monitoring
8.2. Expose
1
2
3
4
5
6
7
kubectl edit svc stable-kube-prometheus-sta-prometheus -n monitoring
# ClusterIP -> LoadBalancer
kubectl get svc -n monitoring

kubectl edit svc stable-grafana -n monitoring
# ClusterIP -> LoadBalancer
kubectl get svc -n monitoring
8.3. Prometheus, Grafana 설정
- 초기 비밀번호: admin / prom-operator
- Add first add source - Prometheus
- Dashboard - New - Import - 6417 (Kubernetes Cluster)
9. ArgoCD 설정
9.1. ArgoCD 설치
1
2
3
4
kubectl create ns three-tier
kubectl create secret generic ecr-registry-secret \
  --from-file=.dockerconfigjson=${HOME}/.docker/config.json \
  --type=kubernetes.io/dockerconfigjson -n three-tier
1
2
3
4
5
6
7
8
9
kubectl create ns argocd
kubectl apply -n argocd -f https://raw.githubusercontent.com/argoproj/argo-cd/v2.14.3/manifests/install.yaml

# Expose
kubectl patch svc argocd-server -n argocd -p '{"spec": {"type": "LoadBalancer"}}'

# Retrieve initial Admin password
kubectl -n argocd get secret argocd-initial-admin-secret -o jsonpath="{.data.password}" | base64 -d
9.2. ArgoCD Repo 설정
- settings - connect repo
9.3. ArgoCD Application 추가
- Secret management 추가 필요 -> Vault 사용 예정
- ”+ new app” -> automatic sync
10. CNAME Setting
- route 53에서 LoadBalancer 에 대한 CNAME 세팅
11. Ingress - TLS 적용
- AWS Certificate manager Service 사용
- request a public certificate
- Domains - “Create records in Route 53”
- 인증이 완료되면 Certificate ARN 복사
alb.ingress.kubernetes.io/certificate-arn: {복사한 Certificate ARN}alb.ingress.kubernetes.io/listen-ports: '[{"HTTP": 80}, {"HTTPS":443}]'alb.ingress.kubernetes.io/ssl-redirect: "443"
1
2
3
4
5
6
7
8
9
10
11
12
13
14
15
16
17
18
19
20
21
22
23
24
25
26
apiVersion: networking.k8s.io/v1
kind: Ingress
metadata:
  name: frontend-ingress
  namespace: three-tier
  annotations:
    alb.ingress.kubernetes.io/certificate-arn: {복사한 Certificate ARN}
    alb.ingress.kubernetes.io/listen-ports: '[{"HTTP": 80}, {"HTTPS":443}]'
    alb.ingress.kubernetes.io/ssl-redirect: "443"
    alb.ingress.kubernetes.io/scheme: internet-facing
    alb.ingress.kubernetes.io/target-type: ip
    alb.ingress.kubernetes.io/healthcheck-path: /health
spec:
  ingressClassName: alb
  rules:
    - host: devops2.front.chaedie.com
      http:
        paths:
          - path: /
            pathType: Prefix
            backend:
              service:
                name: frontend
                port:
                  number: 80
12. EKS Cluster & Jenkins Server 삭제
1
2
3
eksctl delete cluster --name devops-project-2-k8s-eks-cluster --region ap-northeast-2 --wait--timeout 30m

terraform destroy
99. Trouble Shooting
- EKS 노드 갯수를 변경하고 싶을 때
1
2
3
4
5
6
7
8
  eksctl get nodegroup --cluster devops-project-2-k8s-eks-cluster

  eksctl scale nodegroup \
  --cluster devops-project-2-k8s-eks-cluster \
  --name ng-7d39f248 \
  --nodes 1 \
  --nodes-min 1 \
  --nodes-max 1
❌ Dependency Check 도중 jenkins server 응답 없음 현상
- 현상: ec2 console 에서 status check 는 2/2 로 이상없지만 request 에는 응답하지 않음
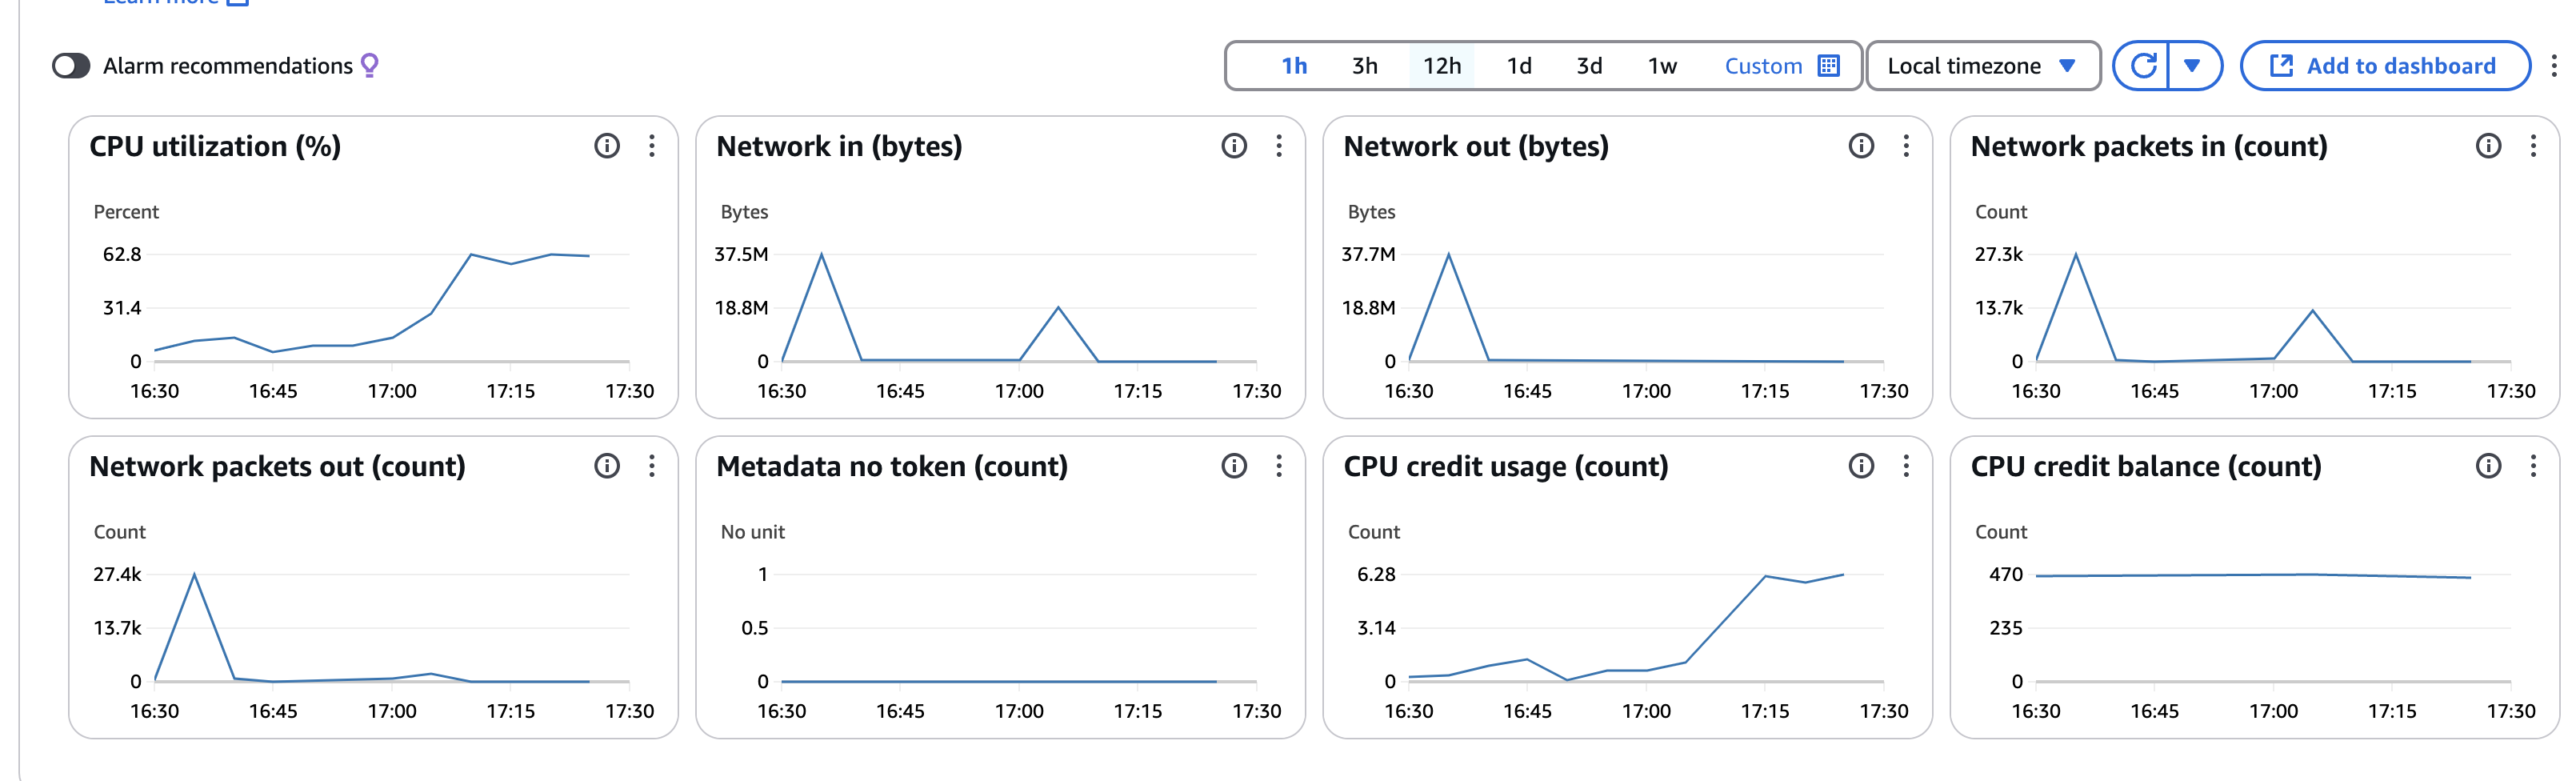
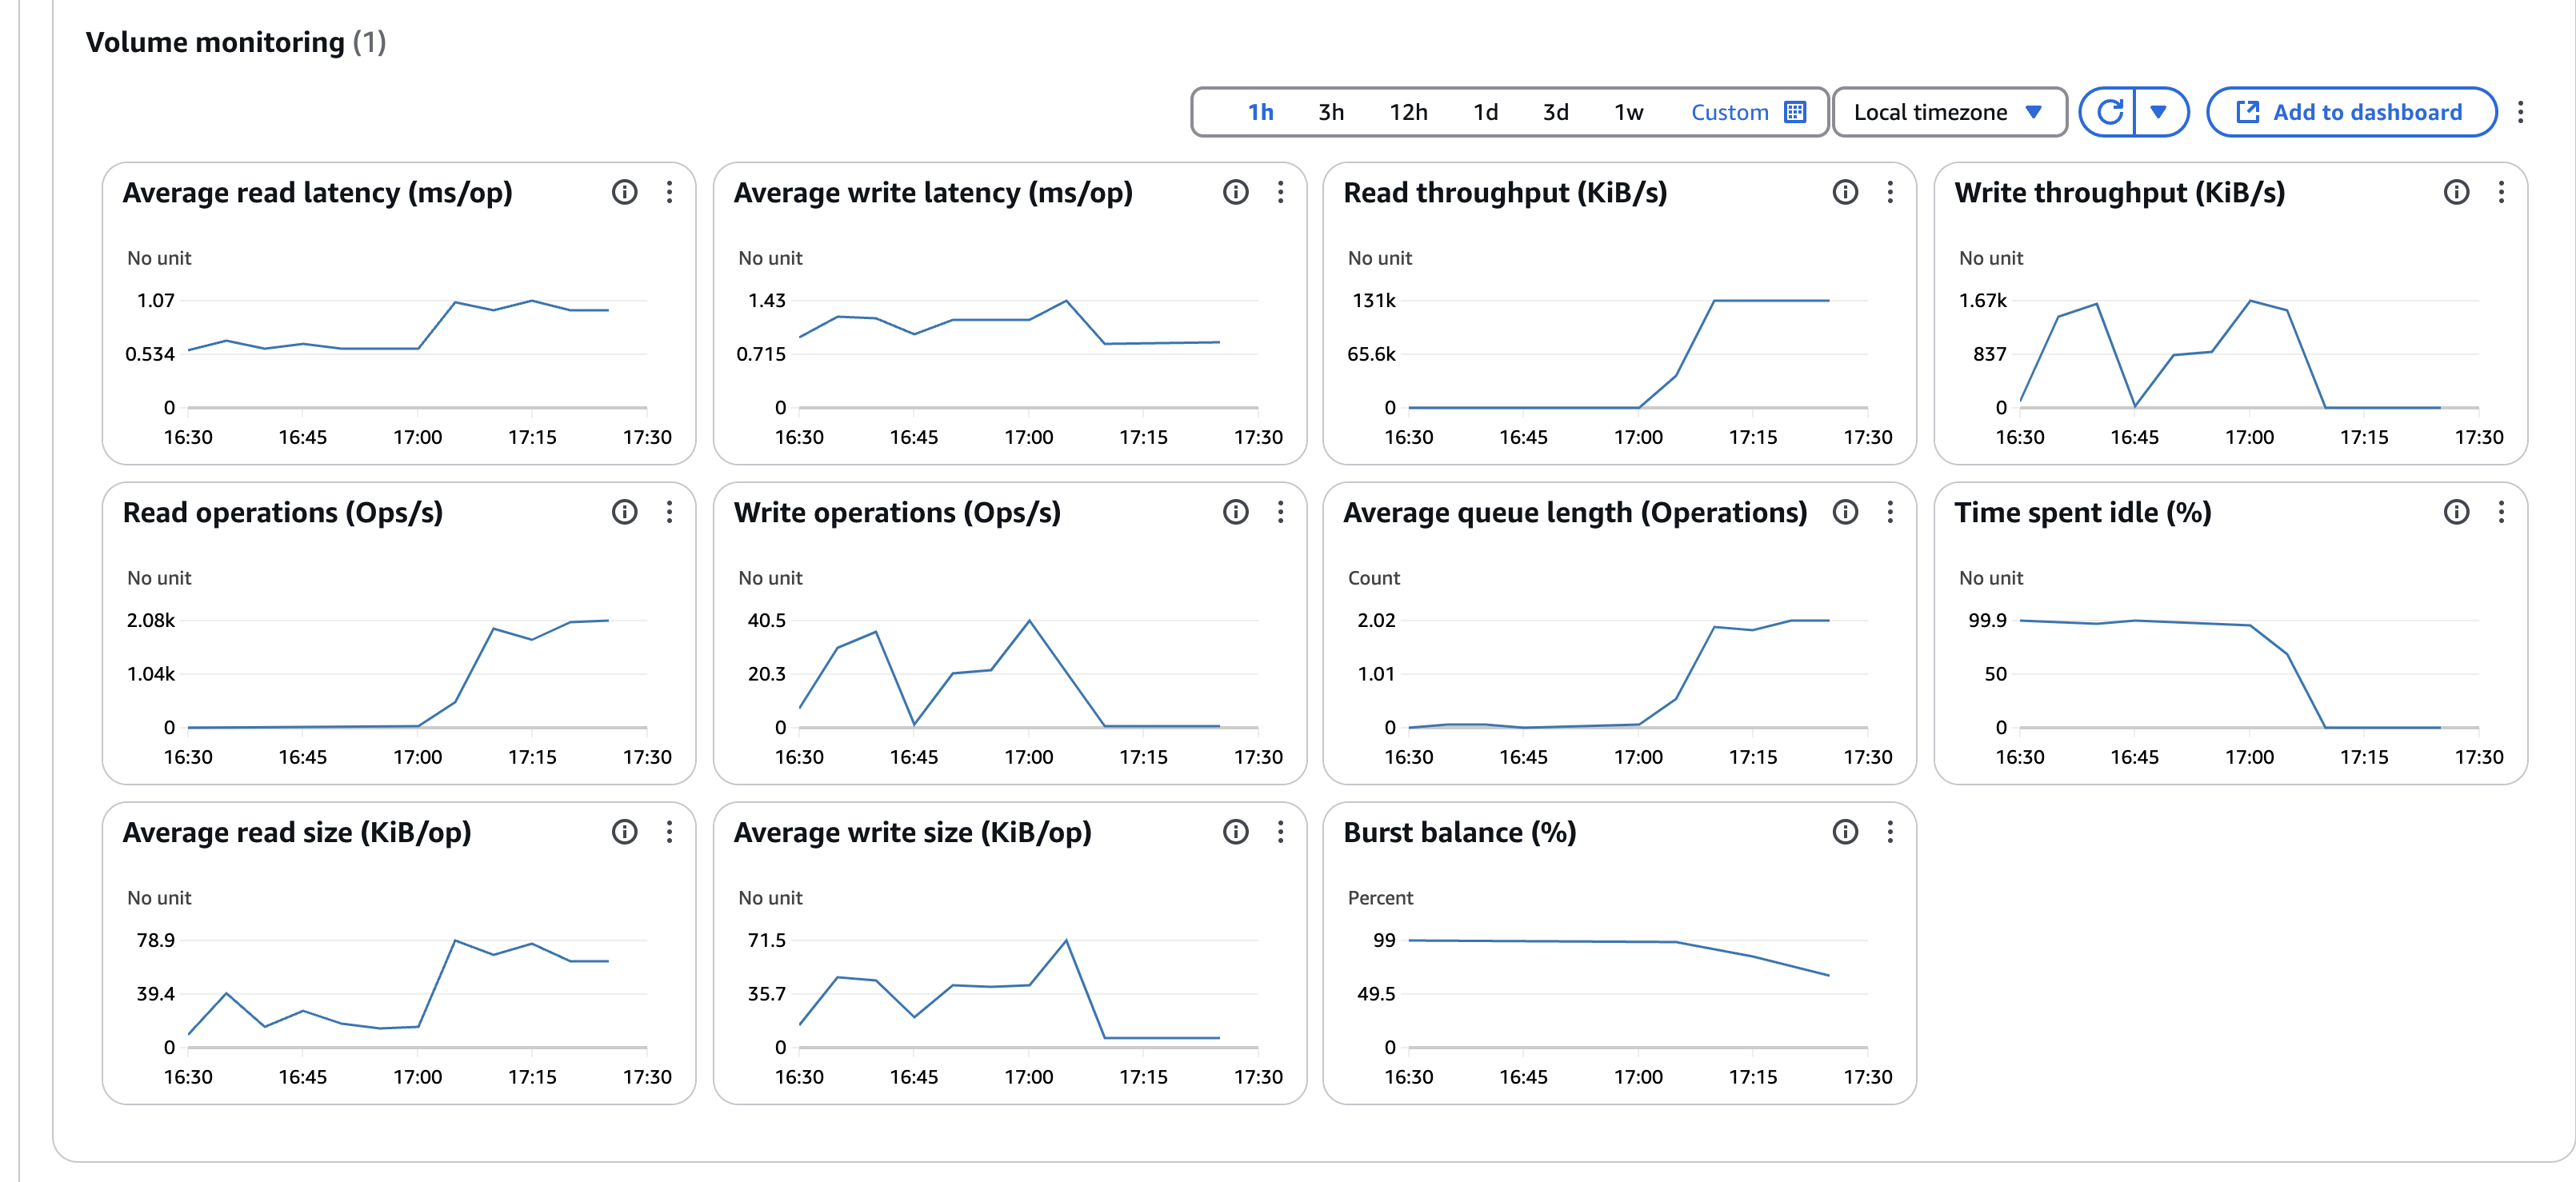
- Monitoring Dashboard 를 보면 CPU Utilization, Storage Throughput 스파크 확인
- AWS 공식 유튜브 영상 - How do I troubleshoot an unresponsive website hosted on my EC2 instance?
- Health Check 확인
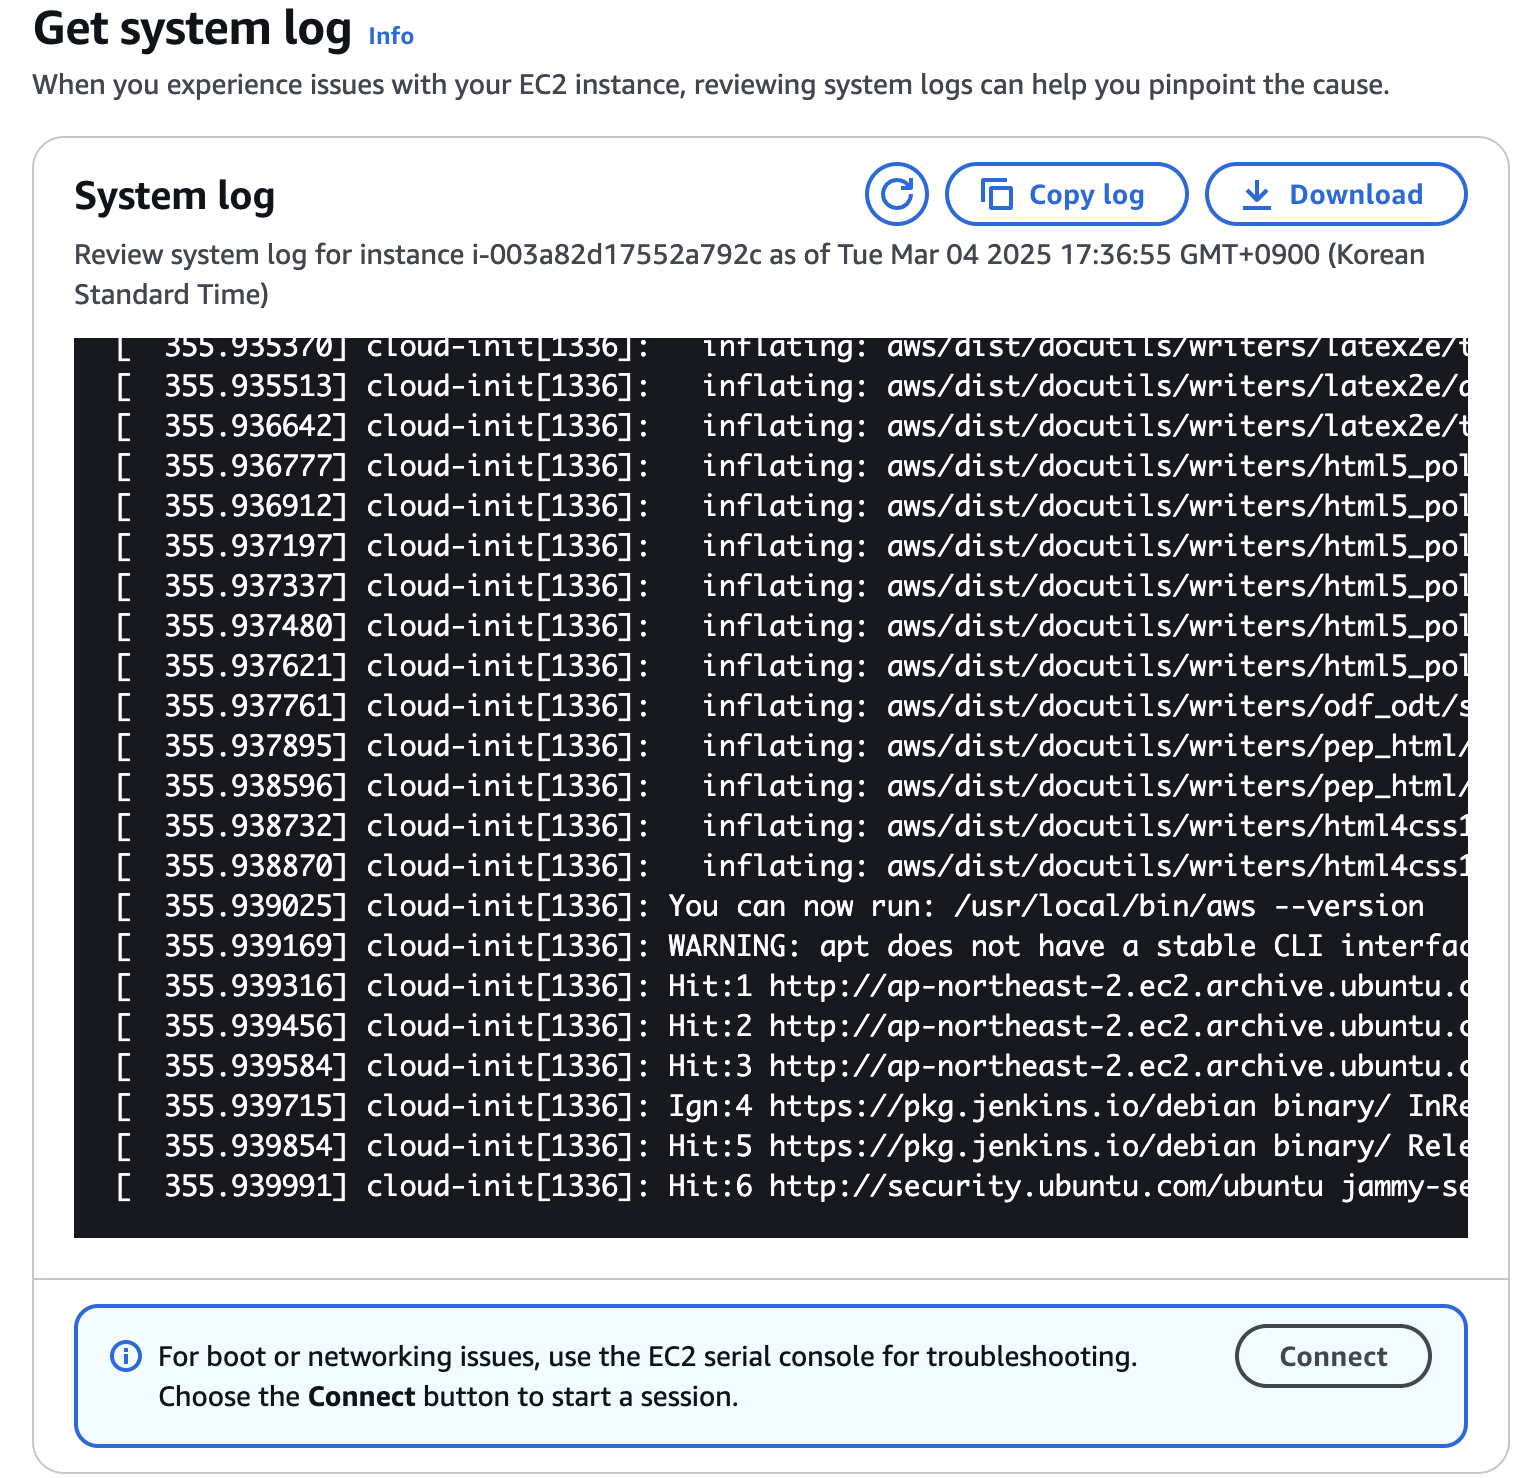
- System Log 확인 for check the kernel panic
- CPU Utilization 확인
- Network in/out 확인
- Storage 확인
- Security Group 확인 (휴먼에러)
- Networking - VPC - network ACL - inbound/outbound rule 확인
- route table 확인
- EIP 확인
- SSH 되는 경우
- 서비스 확인
sudo systemctl status httpd - firewall 확인
sudo firewall-cmd --state - ubuntu 의 경우
sudo ufw status verbose- allow
sudo ufw allow in 80/tcp,sudo ufw allow 443/fcp
- allow
- /var/log/httpd 경로의 error_log, access_log 확인
- 서비스 확인
httpd 서비스에서의 트러블 슈팅 과정을 보여주는 영상이었는데, 해당 영상을 시청하고 나서 ec2가 정상으로 돌아왔다. reboot 명령 때문인지 단지 작업이 끝이 나서인지는 모르곘지만 우선 Trouble shooting 시의 common step 을 한번 훑어보는 기회가 되었다.
❌ ArgoCD 의 일부 pod 들이 Pending 상태인 상황
- ArgoCD 의 일부 pod들이 pending 상태로 노드에 스케쥴링이 되지 않는 현상 발생
kubectl top node를 통해 resource 를 확인해보니 memory 58% 가량 사용중임을 확인- 1개 였던 node 를 2개로 늘려주니 해결이 되었다.. ㅠ
- resource limits를 걸어 주어야하나.. ㅠ

1
2
3
4
5
6
eksctl scale nodegroup \
      --cluster devops-project-2-k8s-eks-cluster \
      --name ng-7d39f248 \
      --nodes 2 \
      --nodes-min 2 \
      --nodes-max 2
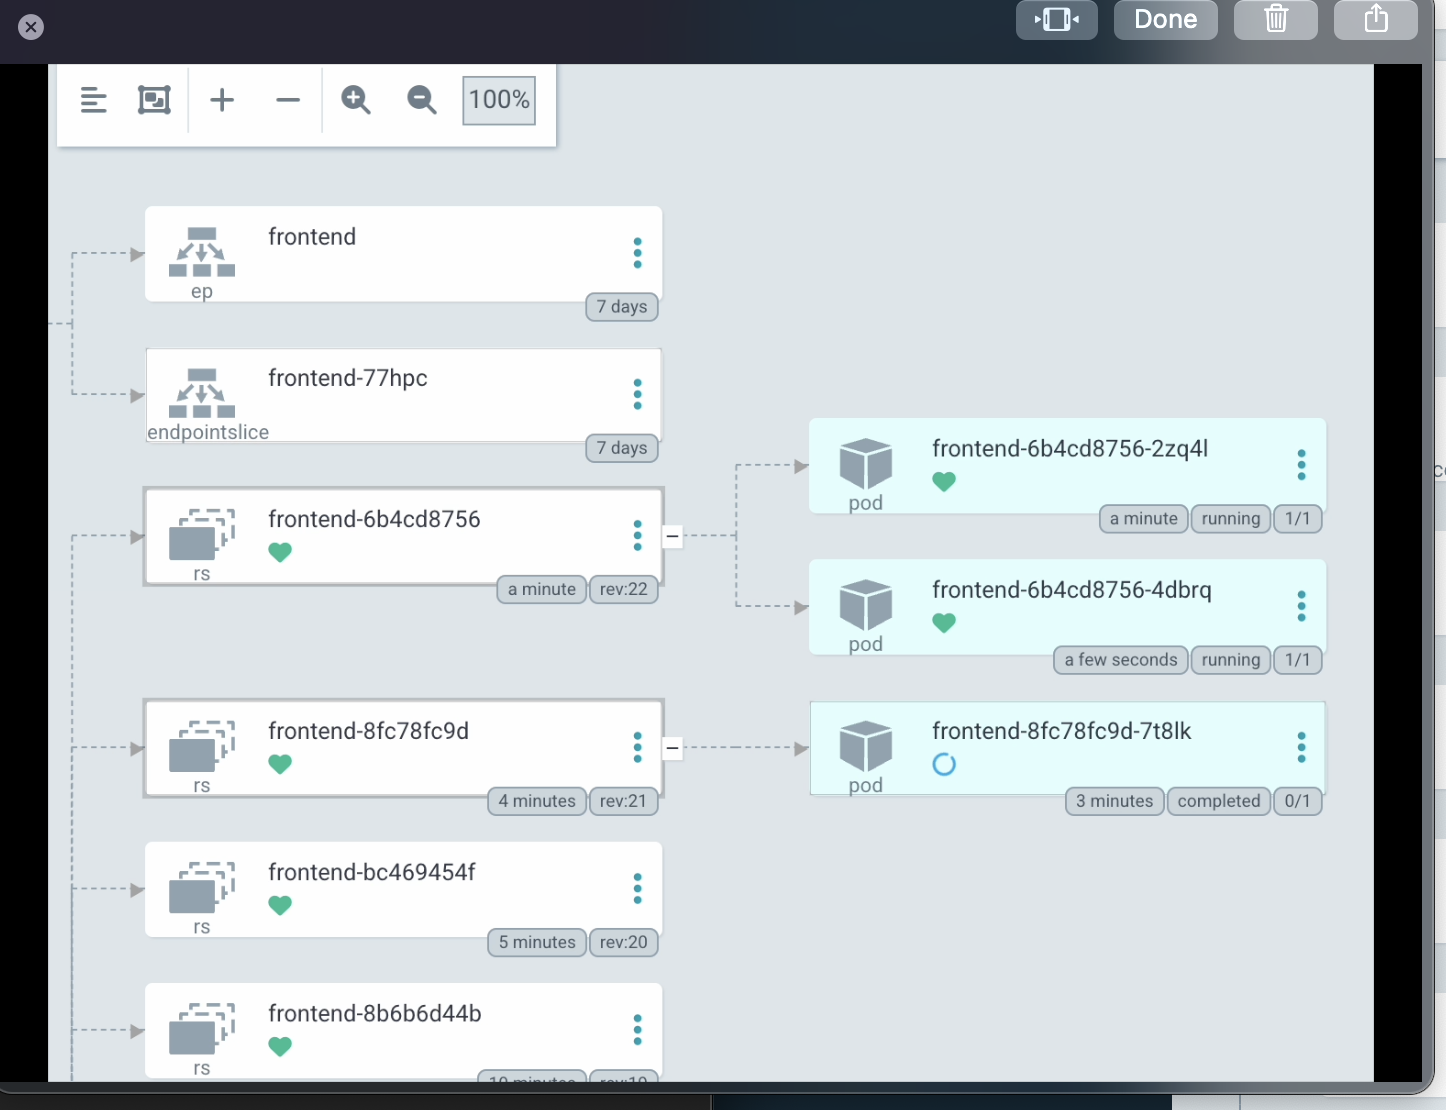
- 노드를 2개로 scale 해주었지만 pending state 의 pod 들은 자동으로 다른 노드로 스케쥴링이 되지 않는다.
- 이 현상은 drain, delete 등으로 해결해주어야하는데 나의 경우는 argoCD namespace의 pods 만 delete 해주어 새로 만든 node로 스케쥴링 되도록 했다.
❌ Node App 에서 kubectl get pods 권한 이슈
- ❌ api server 에서 node client 활용해 kubectl get pods 해주었지만 권한문제로 get pods 가 되지 않았다. 이를 해결 하기 위해 ServiceAccount 에 대해 Role, RoleBinding 을 진행했지만 여전히 권한문제가 발생했다.
- 💡 원인은
three-tiernamespace 에 대한 권한을 쥐어 주고defaultns 에 대한 get pods 를 진행해서 문제였다. - ✅ 이를 해결하기 위해 namespace scope 인 role 이 아닌 cluster scope 인 ClusterRole 을 지정해주었다. 분명 CKA 에서 나와서 알고는 있는 부분이지만 직접 트러블 슈팅을 하면서 깨달음을 얻는 포인트였다.
1
2
3
4
5
6
7
8
9
10
11
12
13
14
15
16
17
18
19
20
21
22
23
24
25
26
27
28
29
30
31
32
apiVersion: v1
kind: ServiceAccount
metadata:
  name: pod-reader
  namespace: three-tier

---

apiVersion: rbac.authorization.k8s.io/v1
kind: ClusterRole
metadata:
  name: pod-reader
rules:
  - apiGroups: [""]
    resources: ["pods", "nodes", "namespaces"]
    verbs: ["get", "list", "watch"]

---

apiVersion: rbac.authorization.k8s.io/v1
kind: ClusterRoleBinding
metadata:
  name: pod-reader-binding
subjectsㅋ:
  - kind: ServiceAccount
    name: pod-reader
    namespace: three-tier
roleRef:
  kind: ClusterRole
  name: pod-reader
  apiGroup: rbac.authorization.k8s.io
❌ Frontend - 503 Service Temporarily Unavailable
- Frontend 도메인에 접근했을 때 503 page 가 계속 보였다. 503 이면 서비스 연결이 제대로 안된것 같은데, yaml 을 아무리 살펴보아도 다른점이 없었따.
kubectl get endpoints -n three-tier를 통해 endpoint 를 확인해보니 forntend 에 대한 endpoint 가 null 로 떠있는걸 확인했고, label selet 이 잘못되었음을 알게 되었다.
❌ ArgoCD - Sync 무한 로딩
- 위 이슈를 고치는 가운데 label 을 변경헀음에도 불구하고 endpoint 가 생기지 않았다.
- ArgoCD 에서 OutOfSync 상태도 제대로 복구가 되지 않았다.
1
Failed sync attempt to 7d93e37ae03f6ca8efbb5f6a0ef42b26d2a6e830: one or more objects failed to apply, reason: error when replacing "/dev/shm/862046775": Deployment.apps "frontend" is invalid: spec.selector: Invalid value: v1.LabelSelector{MatchLabels:v1.LabelSelectorRequirement(nil)}: field is immutable - 결국 위와 같은 에러 메시지를 확인했고, deployment 의 label 은 중도 변경해도 반영되지 않는다는 점을 알게 되었다.
- k8s 를 사용할땐 단순히 –force 옵션으로 직접 apply 를 했기에 간과했던 부분인데 ArgoCD 를 사용할때 Sync 할때는 force 없이 적용이 안되는 경우가 있다는 걸 처음 경험했다.
- ✅ 해결의 경우 argoCD Sync 에서 –force 옵션을 주어 deployment 를 immutable 하게 새로 생성해줌으로 해결되었다.
❌ FrontEnd Pod 내부에서 API Service 못찾는 이슈
- api 서비스로 API 콜을 했으나 서비스를 찾지 못하는 이슈 발생
http://api.three-tier.svc.cluster.local:3000/api/get/pods?namespace=default kubectl get svc -n three-tier해보아도 특별한 문제가 없는 상황💡 그런데.. 생각해보면 react 는 nginx 에서 서빙해줬다 하더라도 결국 client 인 browser 에서 index.html 이 실행되는거고, 그럼 browser 에서
http://api.three-tier....:3000이라는 cluster 내부의 service host 에 API 를 찌르기 때문에 당연히 routing 이 잘못된것이다.- ✅ 그럼 browser 에서 localhost (자기 자신) 의 url 로 찌르게 하고 nginx 가
/apiurl prefix 가 들어오면 cluster 내부의 api service 를 찾도록 만들면 문제 해결
1
2
3
location /api/ {
  proxy_pass http://api.three-tier.svc.cluster.local:3000;
}
- 이 이야기는 FrontEnd 파트장으로 일하면서 개발팀장님께 여러번 반복해서 설명드렸던 사항인데 직접 Infra 를 세팅하다보니 client 에서 API 를 친다는 사실을 살짝 잊고 있었다. 😅
- 아래 처럼 그리면 대강 이해가 될것 같다.
❌ K8s - FrontEnd Deploy 시 잠깐의 504 Gateway Timeout
- ❌ Jenkins Pipeline 이 돌고 ArgoCD 가 Deployment Sync 를 하여 k8s 가 pods 를 rolling update 시키는 상황에서 아주 잠깐 504 Gateway Timeout 이 발생했다.
- Service에 변경점이 없는 상황이고, Rollout 정책이 RollinUpdate 로 되어 있으므로 이론적으로 무중단 배포가 되어야 하는데, 잠깐의 타임아웃이 나는 이유가 별도로 있을것이다.
- pods 가 NotReady 상태인 동안 traffic 을 받지 않도록 하려면 ReadinessProbe 세팅을 해야하는데 현재 프로젝트에선 ReadinessProbe 를 세팅하지 않았다.
- ✅ ReadinessProbe 를 세팅해주고 initialDelaySeconds 를 줌으로써 최초 5초간은 Not Ready 상태로 트래픽을 주지 않도록 세팅해주었다.
1
2
3
4
5
6
readinessProbe:
  httpGet:
    path: /
    port: 80
  initialDelaySeconds: 15
  periodSeconds: 10
- ❌ ReadinessProbe 를 추가하면 트래픽이 안가서 문제 없을 줄 알았는데, 아래와 같은 문제가 생겼다.
1
2
upstream connect error or disconnect/reset before headers. retried and the latest reset reason: remote connection failure, transport failure reason: delayed connect error: Connection refused
- ingress 를 살펴보니
alb.ingress.kubernetes.io/healthcheck-path: /health이렇게 healthcheck를 하고 있었고, 사실 frontend 에 해당 경로가 없으므로 / 로 변경해주었다.- 위 조치를 취했음에도 계속 문제가 생겨 찾아보니 Istio 503 UF 이슈와 “Blame The Network” 이런 글이 있더라.
- 💡 우선 Istio 문제임을 확인하기 위해 istio 를 제거해보았다.
- 해결되지 않음
- 💡 deploy 에 minReadySeconds 를 지정
- 빈도는 줄었으나 502가 발생, 발생 시점은 새로운 파드가 생성될 때가 아닌 기존 파드가 정리되는 짧은 순간임을 포착, 파드 정리가 깔끔하게 될수 있도록 terminationGracePeriodSeconds 을 지정해주었다. (ArgoCD 를 통한 포착, 도움 받은 링크 Kubernetes Pod의 Graceful 한 종료)
- ❌ terminationGracePeriodSeconds 까지 60초로 적용했는데 504 가 발생했다.
- 이쯤되면 deploy, pods 만으로 asset을 무중단으로 serving 하는게 지금 구조에선 불가능한건가? 라는 생각이 든다. pods 를 무작정 늘린다면 해결이 되는걸까?
- 💡 maxUnavailable: 0 설정 실험
- ❌ 0으로 설정해도 애초에 pod 문제가 아니라 alb 나 서비스에서 pod routing 을 잘못하는것 같다.
- 관련 github issue
- 관련 github issue 2
- 관련 내용
- 💡 ALB Ingress yaml 에 헬스체크 관련 어노테이션 수정
- ✅ 체감상 다운타임이 줄어 들었음, ALB 에서의 헬스체크 시간을 줄여주는 것이 관건으로 보인다.
1
2
3
4
5
6
7
8
9
  ## Health Check
  alb.ingress.kubernetes.io/healthcheck-path: /
  alb.ingress.kubernetes.io/healthcheck-protocol: HTTP
  # alb.ingress.kubernetes.io/healthcheck-port: traffic-port
  alb.ingress.kubernetes.io/healthcheck-interval-seconds: '10'
  alb.ingress.kubernetes.io/healthcheck-timeout-seconds: '5'
  alb.ingress.kubernetes.io/success-codes: '200'
  alb.ingress.kubernetes.io/healthy-threshold-count: '2'
  alb.ingress.kubernetes.io/unhealthy-threshold-count: '2'
추가 구현
Rate Limiting
- 불필요한 Work Load를 줄이기 위해 Rate Limiting 구현이 필요하다.
- 1) FrontEnd - Throttling
- 2) Istio Rate Limiting
Rate Limiting (1) - FrontEnd Throttling
- ✅ Lodash 의 Throttle 을 활용해 API 콜에 1초 제한을 주었다.
Rate Limiting (2.1) - Istio Rate Limiting
- 🛠️ 작업 중 - 미완성
- Istio 설치
- 공식문서에는 istio-on-eks 를 통해 설치하라고 되어 있지만… blueprint 부터 너무 많은 것이 다른 상황이라 istioctl 을 통해 직접 설치해볼 예정이다. 잘 되었으면 좋겠다. (다른 상황이라고 표현했지만 eks, ingress, istio 등 기술 전반에 대한 이해도가 부족한게 더 정확한 표현이다.)
- istioctl 설치
1
2
3
4
5
6
7
8
9
10
11
12
13
14
15
16
curl -L https://istio.io/downloadIstio | sh -
cd istio-1.25.0
export PATH=$PWD/bin:$PATH

istioctl install --set profile=default

k get pods -n istio-system

k label ns three-tier istio-injection=enabled --overwrite
k rollout restart deployment -n three-tier
k get pods -n three-tier --show-labels=true

# uninstall
istioctl uninstall -y --purge
- frontend-ingress 인 ALB 가 service 를 바로 보고 있기 때문에 istio ingress gateway 로 연결 할 필요가 있다.
- istio ingress gateway 설정
1
2
3
4
5
6
7
8
9
10
11
12
13
14
15
apiVersion: networking.istio.io/v1beta1
kind: Gateway
metadata:
  name: frontend-gateway
  namespace: three-tier
spec:
  selector:
    istio: ingressgateway
  servers:
    - port:
        number: 80
        name: http
        protocol: HTTP
      hosts:
        - "devops2.front.chaedie.com"
- ALB ingress -> istio ingress gateway 연결
1
2
3
4
5
6
7
8
9
10
11
12
13
14
15
16
17
18
19
20
21
22
apiVersion: networking.k8s.io/v1
kind: Ingress
metadata:
  name: frontend-ingress
  namespace: three-tier
  annotations:
    alb.ingress.kubernetes.io/target-type: ip
    # Istio
    alb.ingress.kubernetes.io/group.name: istio
spec:
  rules:
    - host: devops2.front.chaedie.com
      http:
        paths:
          - path: /
            pathType: Prefix
            backend:
              service:
                # Istio
                name: istio-ingressgateway
                port:
                  number: 80
- istio ingress gateway 설정
Api Deployment 대상으로 EnvoyFilter 생성
1
2
3
4
5
6
7
8
9
10
11
12
13
14
15
16
17
18
19
20
21
22
23
24
25
26
27
28
29
30
31
32
33
34
35
36
apiVersion: networking.istio.io/v1alpha3
kind: EnvoyFilter
metadata:
  name: rate-limit-my-app
  namespace: istio-system
spec:
  workloadSelector:
    labels:
      app: api  # 여기서 특정 Deployment를 타겟팅
  configPatches:
    - applyTo: HTTP_FILTER
      match:
        context: SIDECAR_INBOUND # 특정 사이드카에만 적용
        listener:
          filterChain:
            filter:
              name: "envoy.filters.network.http_connection_manager"
      patch:
        operation: INSERT_BEFORE
        value:
          name: envoy.filters.http.local_ratelimit
          typed_config:
            "@type": type.googleapis.com/envoy.extensions.filters.http.local_ratelimit.v3.LocalRateLimit
            stat_prefix: http_local_rate_limiter
            token_bucket:
              max_tokens: 5          # 최대 토큰 수 (초당 5개 요청 허용)
              tokens_per_fill: 5     # 1초마다 토큰 5개 채움
              fill_interval: 1s      # 채우는 간격 (1초)
            filter_enabled:
              default_value:
                numerator: 100
                denominator: HUNDRED
            filter_enforced:
              default_value:
                numerator: 100
                denominator: HUNDRED
- Test
for i in {1..10}; do curl http://your-service; done - ❌ 여기까지 진행헀더니 갑자기 front 페이지 접속이 안되었다.
- 급하게 istio 를 삭제하고, 적용했던 모든 istio 관련 리소스를 정리했다.
- 네트워크 이슈로 프론트 페이지가 안떠서 이것저것 … 급하게… 알아보다 보니 route 53 에 cname 으로 등록된 alb 의 주소와 ingress 에서의 alb 의 주소가 다르게 적용되어 있었다.
- 아마 ALB Ingress yaml 을 변경하고 적용하는 과정에서 ip 주소를 새로 할당받았나 보다 (AWS 상에서 resource 를 새로 생성한것 같다.)
- 확인해보니 ingress yaml 을 수정하니 argoCD 에서 auto-sync 되지 않았다. replace/force 옵션을 주니 sync 가 되었고, 주소가 변경되었다.
- 💡 혼자 배운걸 적용해보며 만들어가는 토이 프로젝트라 해서 prod 환경만 가지고 진행중이었는데, 실시간으로 해당 페이지를 들어가보는 사람이 있을텐대 다운타임을 만든것 자체가 큰 실수라고 생각한다. dev / prod 환경으로 나눠야겠다. 또한 관련하여 EKS 상 istio 적용 관련하여 학습이 더 필요할 것 같다.
- AWS EKS 환경에서 Istio를 통한 Gateway API 도입 사례
- KANS3 Ingress & Gateway API
- Kubernetes Ingress in 5 mins
- Kubernetes Ingress Explained (2 Types)
- AWS EKS 에서 Istio 와 Application Load Balancer 연결
- Test
Rate Limiting (2.2) - Istio Rate Limiting - 🛠️ 작업 중
- ALB 와 Istio Ingress Gateway 를 연결해주어 ALB 로 들어오는 모든 request 를 istio ingress gateway pod로 보내고, istio ingress gateway 가 각 application service 로 routing 할 예정
- 아래 문서를 보면서 따라 적용할 예정
- AWS EKS에 Istio 설치 및 설정
AWS EKS 에서 Istio 와 Application Load Balancer 연결
1
2
3
4
5
6
7
8
9
10
11
12
13
14
15
16
17
18
19
20
21
22
23
24
25
26
27
28
29
30
31
32
apiVersion: install.istio.io/v1alpha1
kind: IstioOperator
metadata:
  namespace: istio-system
  name: istiocontrolplane
spec:
  profile: default
  components:
    egressGateways:
    - name: istio-egressgateway
      enabled: true
      k8s:
        hpaSpec:
          minReplicas: 2
    ingressGateways:
    - name: istio-ingressgateway
      enabled: true
      k8s:
        hpaSpec:
          minReplicas: 2
    pilot:
      enabled: true
      k8s:
        hpaSpec:
          minReplicas: 2
  meshConfig:
    enableTracing: true
    defaultConfig:
      holdApplicationUntilProxyStarts: true
    accessLogFile: /dev/stdout
    outboundTrafficPolicy:
      mode: ALLOW_ANY # 문서와 다르게 우선 ALLOW_ANY 로 설정
1
2
3
4
5
6
istioctl install -f istio-operator.yaml
kubectl get pods -n istio-system

kubectl label namespace three-tier istio-injection=enabled
k rollout restart deploy -n three-tier
k get pods -n three-tier --show-labels
- 🛠️ 작업 중
이 기사는 저작권자의 CC BY 4.0 라이센스를 따릅니다.